flutter에서 화면 이동을 구현하려면 Navigator 클래스를 사용해야 합니다.
화면 이동을 구현하기 위해서는 다수의 routes가 필요합니다.
route란?
flutter에서는 screen, page를 route라고 부릅니다.
안드로이드에서는 Activity, ios에서는 ViewController와 동일합니다.
main()
void main() => runApp(MyApp());

class MyApp extends StatelessWidget {
  @override
  Widget build(BuildContext context) {
    return MaterialApp(
      home: Screen1(),
    );
  }
}
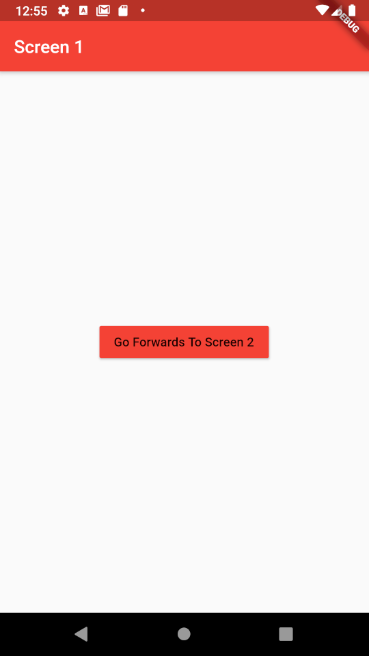
Screen1()
class Screen1 extends StatelessWidget {
  @override
  Widget build(BuildContext context) {
    return Scaffold(
      appBar: AppBar(
        backgroundColor: Colors.red,
        title: Text('Screen 1'),
      ),
      body: Center(
        child: RaisedButton(
          color: Colors.red,
          child: Text('Go Forwards To Screen 2'),
          onPressed: () {},
        ),
      ),
    );
  }
}
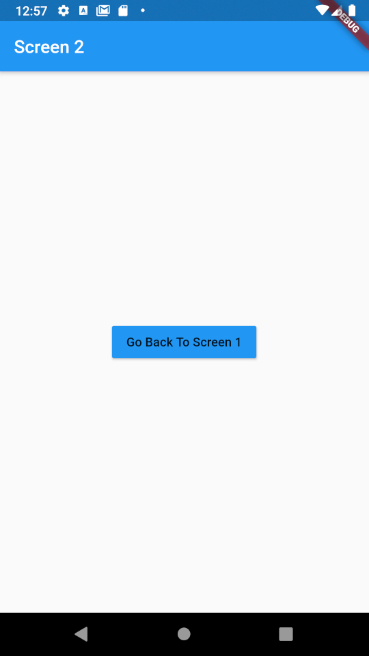
Screen2()
class Screen2 extends StatelessWidget {
  @override
  Widget build(BuildContext context) {
    return Scaffold(
      appBar: AppBar(
        backgroundColor: Colors.blue,
        title: Text('Screen 2'),
      ),
      body: Center(
        child: RaisedButton(
          color: Colors.blue,
          child: Text('Go Back To Screen 1'),
          onPressed: () {},
        ),
      ),
    );
  }
}
간단하게 버튼을 눌렀을 때, 화면이 이동되도록 구성했습니다.
routes가 준비되었다면 화면 이동을 구현해봅니다.
방법은 2가지가 있습니다.
1. Navigator.push() 메서드를 이용
2. Navigator.pushNamed() 메서드를 이용
Navigator.push() 메서드를 활용하여 화면 이동 구현하기.
Navigator.push() 메서드는 인자 값으로 BuildContext 타입의 builder와
Route 타입의 route를 넣어주어야합니다.
새로운 route를 만들어주어도 되지만,
MaterialPageRoute를 활용하면 간단하게 화면 이동을 구현할 수 있습니다.
class Screen1 extends StatelessWidget {
  @override
  Widget build(BuildContext context) {
    return Scaffold(
      appBar: AppBar(
        backgroundColor: Colors.red,
        title: Text('Screen 1'),
      ),
      body: Center(
        child: RaisedButton(
          color: Colors.red,
          child: Text('Go Forwards To Screen 2'),
          onPressed: () {
            Navigator.push(
              context,
              MaterialPageRoute(),
            );
          },
        ),
      ),
    );
  }
}
MaterialPageRoute()의 파라미터로는
파라미터로 BuildContext를 가지고 있는 함수를 넣어줘야합니다.
중괄호 블럭에 Screen2()를 리턴해주거나,
onPressed: () {
            Navigator.push(
              context,
              MaterialPageRoute(
                  builder: (context) {
                  return Screen2();
                  }),
            );
          },
람다식을 이용해서 한 줄 코드로 작성할 수 있습니다.
onPressed: () {
            Navigator.push(
              context,
              MaterialPageRoute(
                  builder: (context) => Screen2()),
            );
          },
Navigator.push()에서 화면 이동이 일어나는 방식은
stack 구조와 같습니다.
한 층 한층 위로 쌓이며 Last In First Out(LIFO)과 같지요.
띄워준 화면에서 이전 화면으로 돌아가고 싶다면
Navigator.pop() 메서드를 활용에 간단하게 돌아갈 수 있습니다.
class Screen2 extends StatelessWidget {
  @override
  Widget build(BuildContext context) {
    return Scaffold(
      appBar: AppBar(
        backgroundColor: Colors.blue,
        title: Text('Screen 2'),
      ),
      body: Center(
        child: RaisedButton(
          color: Colors.blue,
          child: Text('Go Back To Screen 1'),
          onPressed: () {
            Navigator.pop(context);
          },
        ),
      ),
    );
  }
}
Navigator.pushNamed() 메서드를 활용하여 화면 이동 구현하기.
메서드명만 봐도 route에 각각 이름을 명시해주고 화면 이동을 구현할 수 있는 메서드 인듯합니다.
MaterialApp에서 route들에 이름을 명시해줄 수 있습니다.
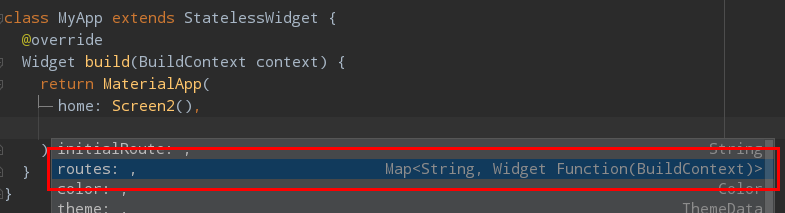
routes를 나열할 때는 Map 자료구조로 인자 값을 넣어줘야 합니다.
key는 string 타입이며, value는 위젯을 리턴하는 함수형입니다.
첫 화면의 key는 '/'로 약속이 되어있습니다.
※ 루트의 key값의 첫 글자는 무조건 /를 넣어줘야 합니다.
void main() => runApp(MyApp());

class MyApp extends StatelessWidget {
  @override
  Widget build(BuildContext context) {
    return MaterialApp(
      routes: {
        '/': (context) => Screen0(),
        '/first': (context) => Screen1(),
        '/second': (context) => Screen2(),
      },
    );
  }
}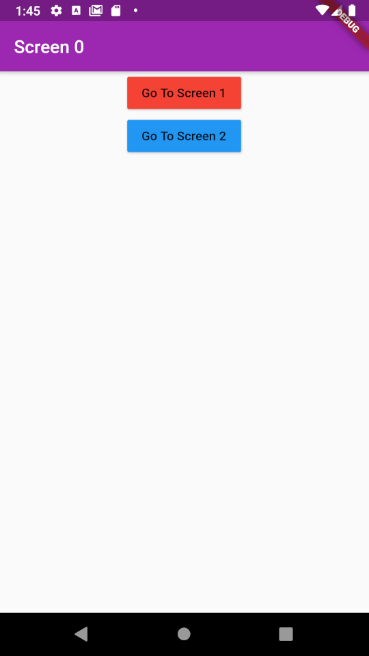
home 파라미터를 지정해주지 않았음에도 Screen0() route가 첫 화면으로 시작합니다.
initialRoute 속성은 앱 시작할 시에 route 경로를 지정하는 속성입니다.
initialRoute: '/',
단, 여기서 주의해야 할 점이 있습니다.
'/'를 시작 route 키로 설정했을 경우 home 속성을 같이 명시해서는 안됩니다.
class MyApp extends StatelessWidget {
  @override
  Widget build(BuildContext context) {
    return MaterialApp(
      initialRoute: '/',
      home: Screen0(),
      routes: {
        '/': (context) => Screen0(),
        '/first': (context) => Screen1(),
        '/second': (context) => Screen2(),
      },
    );
  }
}
바로 위와 같은 에러와 맞닥뜨리게 되죠..ㅎㅎ
루트 이름을 설정해주었으면 이제 화면 이동을 구현해봐야겠지요
Navigator.push() 메서드에서의 구현 방식보다 간단합니다.
두 개의 인자들만 넣어주면 됩니다.
Navigator.pushNamed(context, 'route name');
class Screen0 extends StatelessWidget {
  @override
  Widget build(BuildContext context) {
    return Scaffold(
      appBar: AppBar(
        backgroundColor: Colors.purple,
        title: Text('Screen 0'),
      ),
      body: Center(
        child: Column(
          children: <Widget>[
            RaisedButton(
              color: Colors.red,
              child: Text('Go To Screen 1'),
              onPressed: () {
                Navigator.pushNamed(context, '/first');
              },
            ),
            RaisedButton(
              color: Colors.blue,
              child: Text('Go To Screen 2'),
              onPressed: () {
                Navigator.pushNamed(context, '/second');
              },
            ),
          ],
        ),
      ),
    );
  }
}
아주 간단하쥬 😁😁
'코딩 이야기 > Flutter' 카테고리의 다른 글
| [Flutter] Flutter 웹 release - Icon 엑박 이슈 (0) | 2021.01.16 |
|---|---|
| [Flutter] Flutter Web - Github Page를 통해 플러터 웹 호스팅 (1) | 2021.01.16 |
| flutter ThemeData - 앱의 테마를 지정해보자. (1) | 2020.12.04 |
| 웹에서 flutter 프로젝트 - flutter 온라인 IDE 추천 [flutLab] (1) | 2020.12.01 |